
1. Kubernetes Availability & Network
- 쿠버네티스 클러스터의 안정적인 운영을 위해 필요한 가용성 확보 방법
- HPA와 VPA를 통해 부하에 따른 워크로드의 수직 및 수평 자동 확장
- 애플리케이션 설정과 보안 정보를 환경에 맞게 분리 관리하는 방법
- ConfigMap과 Secret을 활용해 설정값과 민감 정보를 분리하고 안전하게 관리하는 방법을 배웁니다
- 쿠버네티스 서비스 타입을 통한 내부 및 외부 트래픽 연결 구조 이해
- ClusterIP, NodePort, Ingress 등 다양한 서비스 유형을 통해 클러스터 내부 및 외부와 통신하는 방법을 익힙니다
- 네이티브 쿠버네티스 환경에서 사용하는 스토리지의 개념과 특징 간단 정리
실습 환경 구성 (Kind, Controlplane 1 + Worker 1)
- Windows WSL2 기준, kind 및 환경구성
# Windows WSL2 (Ubuntu) - PowerShell / CMD (관리자 권한)
dism.exe /online /enable-feature /featurename:Microsoft-Windows-Subsystem-Linux /all /norestart
dism.exe /online /enable-feature /featurename:VirtualMachinePlatform /all /norestart
wsl --list -o
wsl --install -d ubuntu

# WSL2 Ubuntu
sudo snap install docker
sudo groupadd docker
sudo usermod -aG docker $USER
docker --version

# Kind 설치
[ $(uname -m) = x86_64 ] && curl -Lo ./kind https://kind.sigs.k8s.io/dl/v0.27.0/kind-linux-amd64
sudo chmod +x ./kind
sudo mv ./kind /usr/local/bin/kind

# Kind Cluster 생성
kind create cluster

# kubectl 설치
sudo snap install kubectl --classic
kubectl get pods -A

# Krew 설치
wget https://github.com/kubernetes-sigs/krew/releases/download/v0.4.5/krew-linux_amd64.tar.gz
tar zxvf krew-linux_amd64
./krew-linux_amd64 install krew
~/.bashrc >> export PATH="${KREW_ROOT:-$HOME/.krew}/bin:$PATH"
source ~/.bashrc
kubectl krew

# k9s 설치
wget https://github.com/derailed/k9s/releases/download/v0.50.4/k9s_linux_amd64.deb
sudo dpkg -i k9s_linux_amd64.deb
sudo apt-get install -f
k9s

# Helm 설치
sudo snap install helm --classic
helm ls- 멀티노드 클러스터 with kube-ops-view & Mapping ports
# '컨트롤플레인, 워커 노드 1대' 클러스터 배포 : 파드에 접속하기 위한 포트 맵핑 설정
cat <<EOT> kind-2node.yaml
kind: Cluster
apiVersion: kind.x-k8s.io/v1alpha4
nodes:
- role: control-plane
- role: worker
  extraPortMappings:
  - containerPort: 30000
    hostPort: 30000
    listenAddress: "0.0.0.0" # Optional, defaults to "0.0.0.0"
    protocol: tcp # Optional, defaults to tcp
  - containerPort: 30001
    hostPort: 30001
EOT

kind create cluster --config kind-2node.yaml

# 배포 확인
kind get clusters
kind get nodes

# 노드 확인
kubectl get nodes -o wide

# 노드에 Taints 정보 확인
kubectl describe node kind-control-plane | grep Taints
Taints:             node-role.kubernetes.io/control-plane:NoSchedule

kubectl describe node kind-worker | grep Taints
Taints:             <none>

# 컨테이너 확인 : 컨테이너 갯수, 컨테이너 이름 확인
# kind yaml 에 포트 맵핑 정보 처럼, 자신의 PC 호스트에 30000 포트 접속 시, 워커노드(실제로는 컨테이너)에 TCP 30000 포트로 연결
# 즉, 워커노드에 NodePort TCP 31000 설정 시 자신의 PC 호스트에서 접속 가능!
docker ps
docker port kind-worker
30000/tcp -> 0.0.0.0:30000
30001/tcp -> 0.0.0.0:30001
배포 확인
- controlplane, worker 각 1대의 노드 확인
- worker의 각 30000/30001 포트는 호스트와 매핑되어있음

2. 쿠버네티스 가용성 (Availability)
- 쿠버네티스 환경에서는
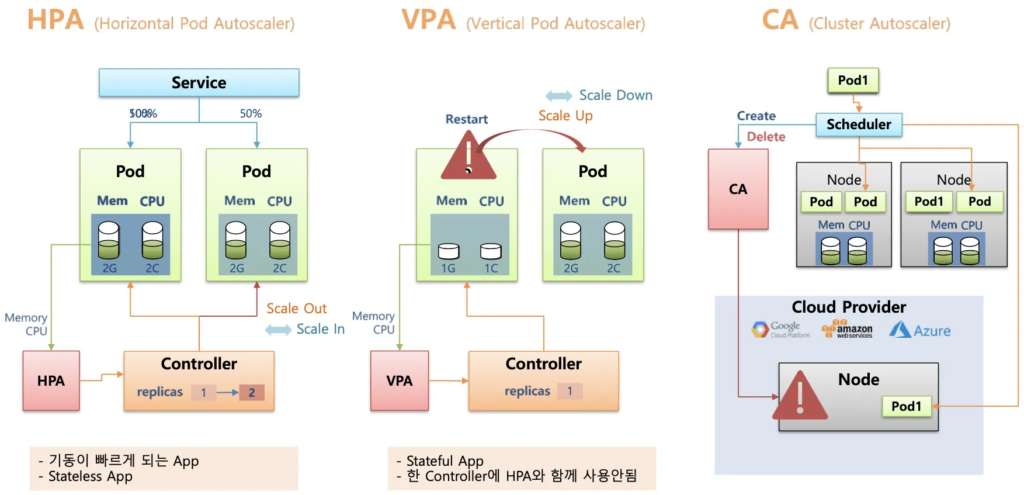
가용성 (Availability)을 확보하기 위한 다양한 방법이 존재- HPA (Horizontal Pod Autoscaling) : Pod 수평 확장 (스케일 In – Out)
- Pod 개수 증감을 통한 부하 분산
- VPA (Vertical Pod Autoscaling) : Pod 수직 확장 (스케일 Up)
- Pod 리소스(CPU, Mem 등) 증감을 통한 성능 조정
- CA (Cluster Autoscaling) : Node 확장 (Cloud 환경)
- Worker 노드 개수 증감을 통한 부하 분산
- HPA (Horizontal Pod Autoscaling) : Pod 수평 확장 (스케일 In – Out)
- Metrics Server 설치
- k8s 클러스터 내 Pod/Node 리소스 사용량(CPU, 메모리 등)을 수집하는 경량화된 모듈
- 각 노드의 Kubelet에서 지표를 주기적으로 수집해 API Server에 제공
- HPA나 VPA 같은 자동 확장 컨트롤러가 리소스 사용량을 기준으로 동작할 수 있도록 데이터 수집
- 실시간 모니터링 도구가 아닌, 자동화된 리소스 조정을 위한 용도로 사용
# Metrics Server 설치
kubectl apply -f https://github.com/kubernetes-sigs/metrics-server/releases/latest/download/components.yaml

# Metrics Server SSL 무시
kubectl patch deployment metrics-server -n kube-system --type=json \
  -p='[{"op": "add", "path": "/spec/template/spec/containers/0/args/-", "value": "--kubelet-insecure-tls"}]'

# Metrics Server 배포 확인
kubectl get pods -n kube-system -l k8s-app=metrics-server

# 쿠버네티스 리소스 자원 사용량 확인
kubectl top node
kubectl top pods -A

# CPU, Memory 내림차순
kubectl top pods -A --sort-by=cpu
kubectl top pods -A --sort-by=memory
2.1. HPA (Horizontal Pod Autoscaling)
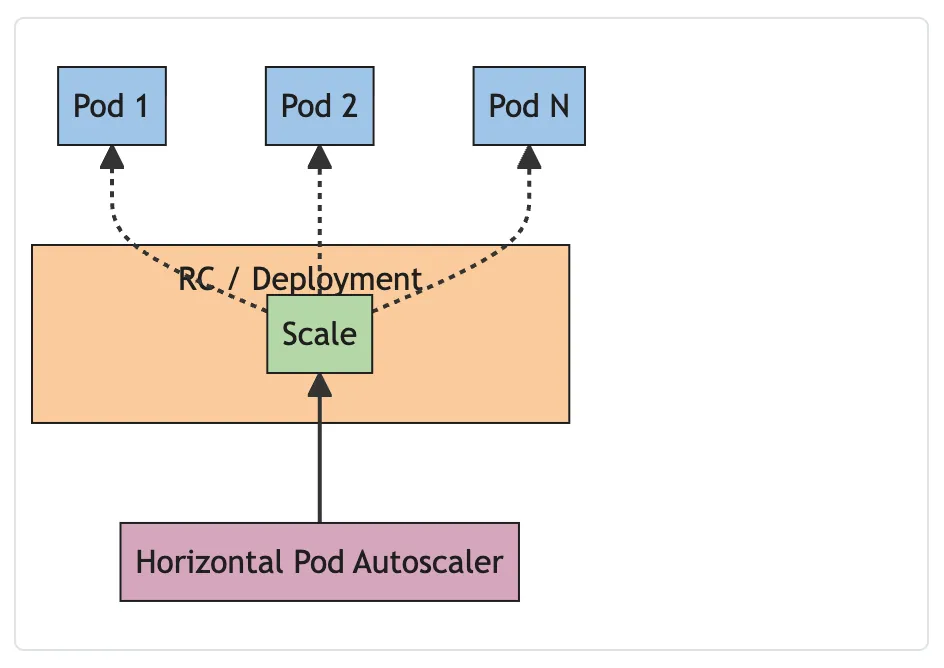
- 수평 스케일링(HPA, Horizontal Pod Autoscaling)
- 애플리케이션의 부하에 따라 파드의 개수를 자동으로 조절
- CPU 사용률, 메모리 사용량, 또는 사용자 정의 메트릭을 기준으로 동작
- Metrics Server로부터 수집한 지표가 설정된 임계치를
- 초과하면 파드의 replicas 수를 증가
- 줄어들면 파드의 replicas 수를 감소
- 워크로드 변화에 따라 리소스를 효율적으로 할당 / 과도한 리소스 낭비 방지
- 기본 YAML spec
apiVersion: autoscaling/v2
kind: HorizontalPodAutoscaler
metadata:
  name: hpa-sample
spec:
  scaleTargetRef:          # Scale 타겟 지정
    apiVersion: apps/v1
    kind: Deployment
    name: my-app           # Deployment 이름
  minReplicas: 2           # 최소 Pod
  maxReplicas: 10          # 최대 Pod
  metrics:                 # Scale 기준 지표 설정
    - type: Resource
      resource:
        name: cpu
        target:
          type: Utilization
          averageUtilization: 50  # CPU 사용률 50% 기준
    - type: Resource
      resource:
        name: memory
        target:
          type: Utilization
          averageUtilization: 70  # 메모리 사용률 70% 기준
HPA 구성
- nginx deploy 배포
cat << EOF >> hpa-nginx.yaml
apiVersion: apps/v1
kind: Deployment
metadata:
  name: hpa-nginx
spec:
  replicas: 1
  selector:
    matchLabels:
      app: hpa-nginx
  template:
    metadata:
      labels:
        app: hpa-nginx
    spec:
      containers:
      - name: hpa-nginx
        image: nginx
        resources:
          requests:
            cpu: 50m
          limits:
            cpu: 100m
        ports:
        - containerPort: 80
---
apiVersion: v1
kind: Service
metadata:
  name: hpa-nginx
  labels:
    app: hpa-nginx
spec:
  ports:
  - port: 80
  selector:
    app: hpa-nginx
EOF

cat hpa-nginx.yaml

# Deployment 배포
kubectl apply -f hpa-nginx.yaml

kubectl get deploy,pod- 명령형으로 hpa 설정
# HPA 생성
kubectl autoscale deployment hpa-nginx --cpu-percent=50 --min=1 --max=10
# HPA 확인
kubectl get hpa
...
NAME REFERENCE TARGETS MINPODS MAXPODS REPLICAS AGE
hpa-nginx Deployment/hpa-nginx cpu: 0%/50% 1 10 1 26s
....
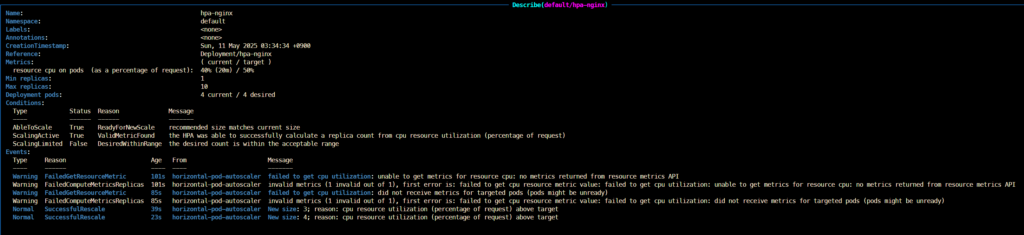
# HPA 상세 정보 확인
kubectl describe hpa- pod 부하 생성
# 터미널 1번
while true; do kubectl get hpa; kubectl top pods; sleep 1s; done

# 터미널 2번
kubectl run -i --tty load-generator --rm --image=busybox:1.28 --restart=Never -- /bin/sh -c "while true; do wget -q -O- http://hpa-nginx.default.svc.cluster.local; done"

# 실습 종료 후 리소스 삭제
kubectl delete hpa --all
kubectl delete -f hpa-nginx.yaml
결과 확인
- http 요청에 따른 nginx 파드의 CPU 부하 증가
- metrics-server에 기록 후 scailng triggered

2.2. VPA (Vertical Pod Autoscaling)
- 수직 스케일링(VPA, Vertical Pod Autoscaling)
- 파드의 리소스 요청값(CPU, 메모리)을 자동으로 조정
- HPA가 파드 개수를 조정하는 것과 달리, VPA는 각 파드가 사용하는 리소스의 크기를 조절함
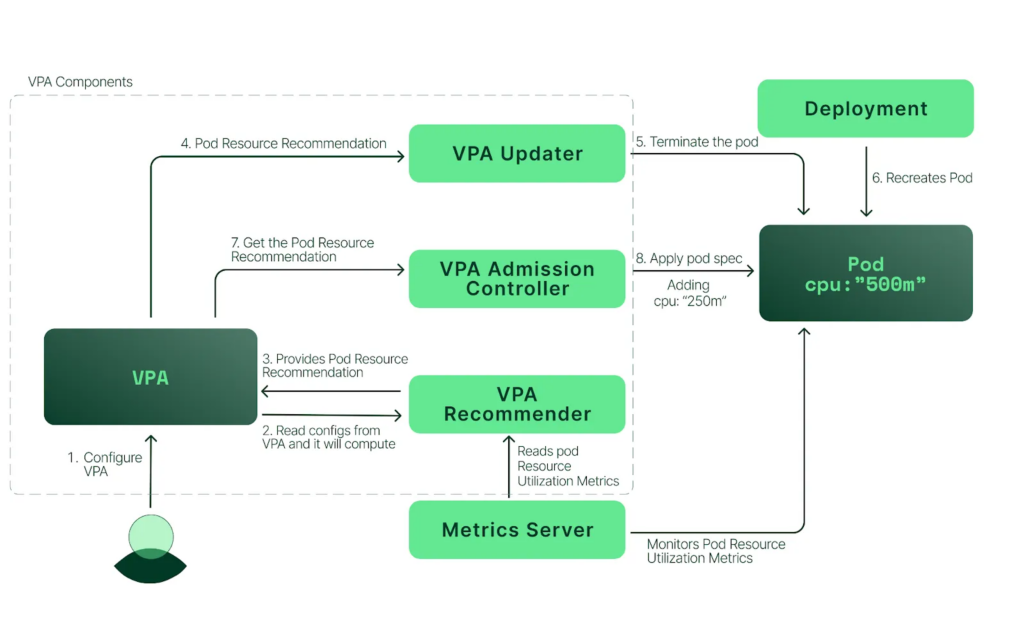
- VPA Recommender가 리소스 사용량을 분석해 최적의 요청값을 계산하고 반영함
- HPA와 VPA는 같은 Deployment에 동시에 적용할 수 없음
- Kubernetes v1.33부터는 VPA 기능이 기본 활성화되어 있으나, kind에서는 v1.32까지 지원되므로 별도의 컨트롤러 설치가 필요함
- 기본 구성 요소는 VPA Recommender, Updater, Admission Plugin 세 가지로 이루어짐
- 기본 YAML 구성
apiVersion: autoscaling.k8s.io/v1
kind: VerticalPodAutoscaler
metadata:
  name: my-app-vpa
spec:
  targetRef:                   # Scale 대상
    apiVersion: apps/v1
    kind: Deployment
    name: my-app               # Deployment 명칭
  updatePolicy:
    updateMode: "Auto"         # VPA Recommender 에 의해 자동 조정 활성화
  resourcePolicy:
    containerPolicies:
      - containerName: my-app-container # Container 명칭 "*" 사용 가능
        minAllowed:            # 컨테이너가 할당받을 수 있는 최소 리소스
          cpu: "200m"
          memory: "512Mi"
        maxAllowed:            # 컨테이너가 할당받을 수 있는 최대 리소스
          cpu: "2"
          memory: "2Gi"
VPA 구성 및 테스트
- EKS Workshop 소스를 사용한 VPA 배포
# EKS Workshop 소스 사용
git clone https://github.com/kubernetes/autoscaler.git

# VPA 배포
cd autoscaler/vertical-pod-autoscaler/
./hack/vpa-up.sh

# VPA Controller 확인
kubectl get pods -n kube-system | grep vpa

# VPA 제거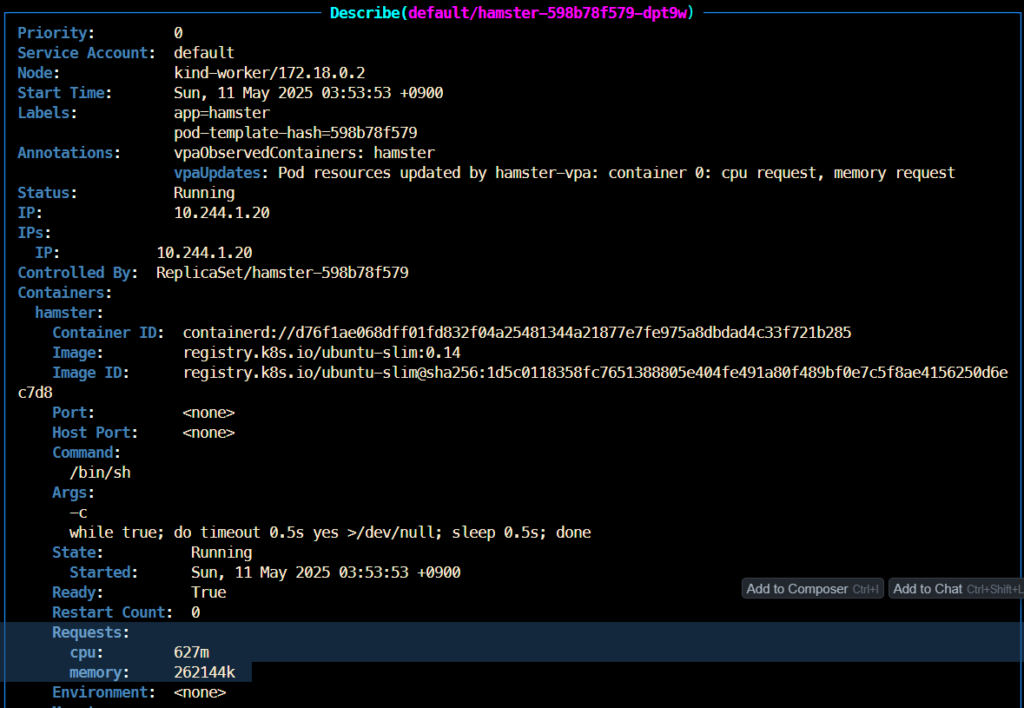
./hack/vpa-down.sh- 0.1 cpu 를 요청한 2개 Pod 배포 (실제 사용량보다 부족한 상태)
apiVersion: "autoscaling.k8s.io/v1"
kind: VerticalPodAutoscaler
metadata:
  name: hamster-vpa
spec:
  targetRef:
    apiVersion: "apps/v1"
    kind: Deployment
    name: hamster
  resourcePolicy:
    containerPolicies:
      - containerName: '*'
        minAllowed:
          cpu: 100m
          memory: 50Mi
        maxAllowed:
          cpu: 1
          memory: 500Mi
        controlledResources: ["cpu", "memory"]
---
apiVersion: apps/v1
kind: Deployment
metadata:
  name: hamster
spec:
  selector:
    matchLabels:
      app: hamster
  replicas: 2
  template:
    metadata:
      labels:
        app: hamster
    spec:
      securityContext:
        runAsNonRoot: true
        runAsUser: 65534 # nobody
      containers:
        - name: hamster
          image: registry.k8s.io/ubuntu-slim:0.14
          resources:
            requests:
              cpu: 100m
              memory: 50Mi
          command: ["/bin/sh"]
          args:
            - "-c"
            - "while true; do timeout 0.5s yes >/dev/null; sleep 0.5s; done"
결과 확인
- 리소스 부족한 pod 제거(evict) 이후 적절한 resource request 를 갖고 재생성


2.3. CA (Cluster Autoscaler)
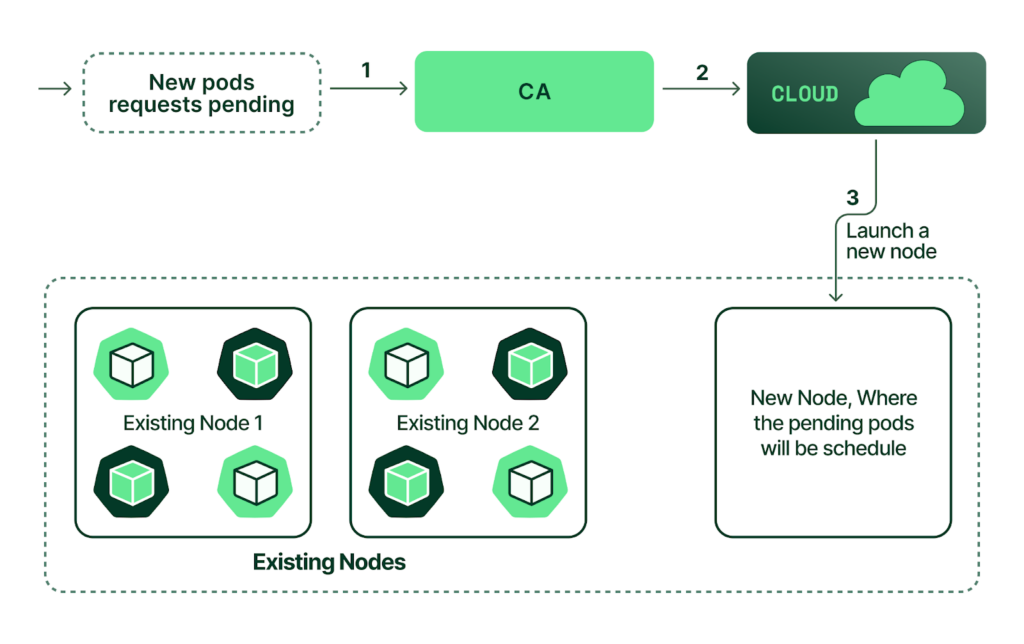
- Cluster Autoscaler는 쿠버네티스 클러스터에서 워커 노드의 수를 자동으로 조절하는 컴포넌트로, 클러스터에 스케줄할 여유가 없는 파드가 존재할 경우 노드를 자동으로 추가하고, 사용되지 않는 노드는 자동으로 제거함
- HPA나 VPA는 파드 단위에서의 리소스 확장을 다루지만, CA는 파드가 배치될 공간 자체가 없을 때 클러스터의 인프라 레벨(노드 수)을 조정함
- 일반적으로 GCP, AWS, Azure 같은 클라우드 환경에서 사용되며, 클라우드 프로바이더 API를 통해 실제 VM 인스턴스를 자동으로 생성하거나 삭제함
- 설정된 노드 그룹이나 Auto Scaling Group 단위로 동작하며, 노드의 종류나 개수는 사전에 정해져 있음
- 동작 방식
- Cluster Autoscaler가 활성화되면, 대기 상태(pending)의 파드가 있는지 확인한다. 기본 스캔 주기는 10초이며,
--scan-interval플래그를 사용하여 설정할 수 있다. - 대기 중인 파드가 있고 클러스터에 더 많은 리소스가 필요한 경우, CA는 관리자가 설정한 제약 조건 내에서 새로운 노드를 추가하여 클러스터를 확장한다. AWS, Azure, GCP 같은 퍼블릭 클라우드 공급자들은 Kubernetes Cluster Autoscaler 기능을 지원하며, 예를 들어 AWS EKS는 Auto Scaling Group 기능을 통해 EC2 가상 머신을 자동으로 추가하거나 제거한다.
- Kubernetes는 새로 프로비저닝된 노드를 컨트롤 플레인에 등록하여 스케줄러가 해당 노드를 사용할 수 있도록 만든다.
- 마지막으로 Kubernetes 스케줄러가 대기 중인 파드를 새 노드에 할당한다.
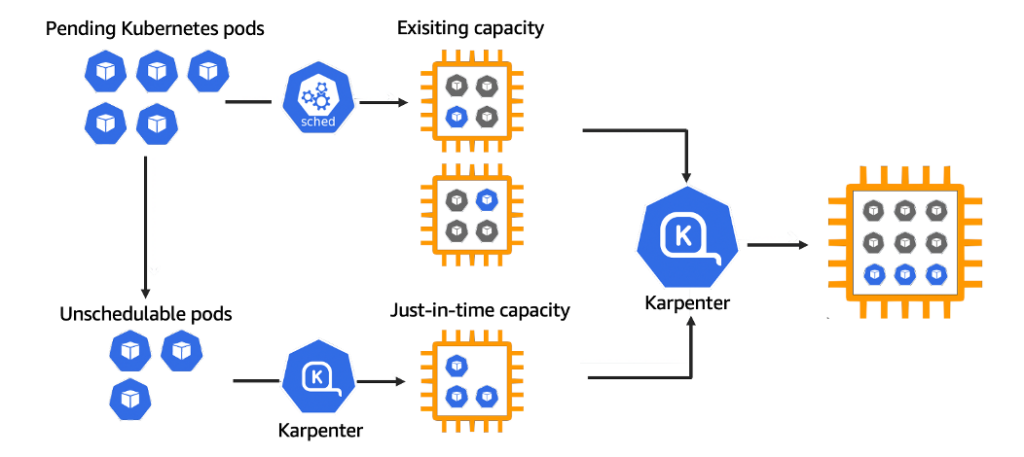
- Karpenter는 Cluster Autoscaler와 동일하게 노드의 자동 확장을 수행하지만, 더 유연하고 빠른 리소스 프로비저닝을 지원하는 차세대 오토스케일러임
- 기존 CA는 정해진 노드 그룹 내에서 확장을 수행하는 반면, Karpenter는 파드의 요구사항에 따라 가장 적절한 인스턴스 타입과 크기를 선택해 노드를 생성함
- 즉, HPA의 수평 확장 + VPA의 리소스 분석 역할을 포함한 방식으로, 클러스터의 리소스를 더 정밀하게 최적화함
- 탄력적인 리소스 활용과 함께 불필요한 노드를 빠르게 제거할 수 있어, 비용 효율성과 응답 속도 면에서 유리함
- AWS Fargate, EC2, Bottlerocket 등 다양한 백엔드를 지원하며, 점점 기존 CA를 대체하는 방향으로 확산되고 있음
2.4. KEDA (Kubernetes Event-Driven Autoscaler)
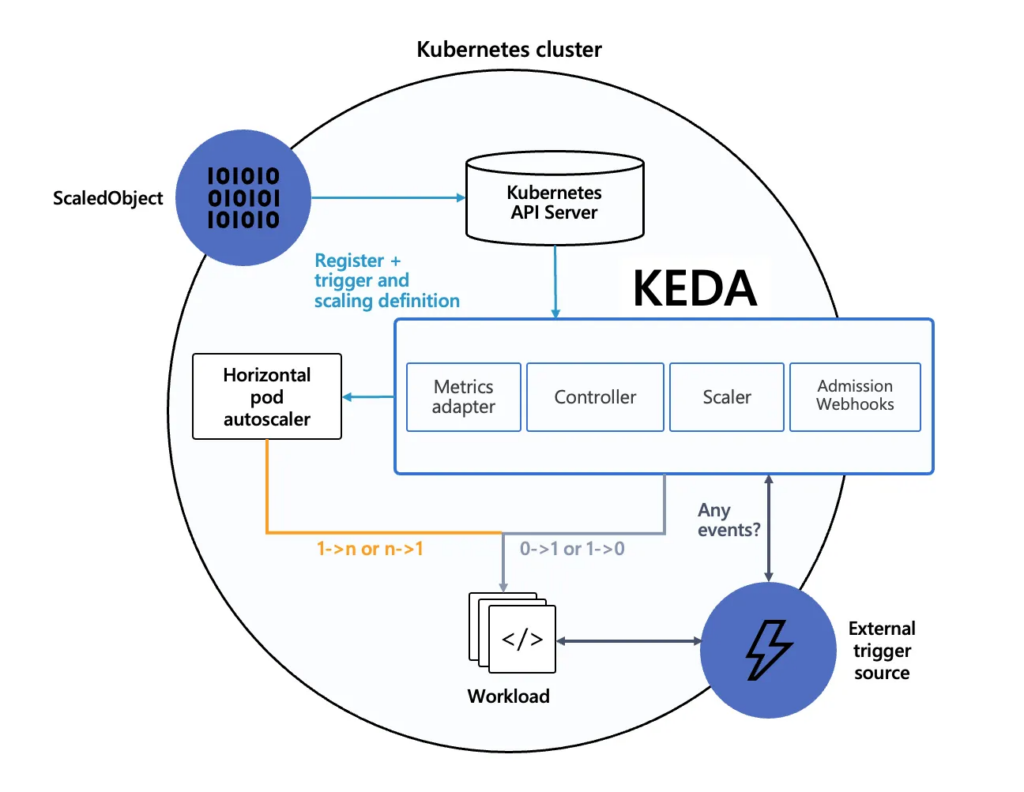
KEDA (Kubernetes Event-Driven Autoscaler)
- KEDA(Kubernetes Event-Driven Autoscaler)는 쿠버네티스에서 이벤트 기반으로 워크로드를 자동 확장해주는 확장 도구임
- 기존의 HPA는 CPU, 메모리와 같은 리소스 사용량을 기준으로만 확장 조건을 판단하지만, KEDA는 외부 이벤트나 메시지 큐 상태 등 다양한 신호를 기반으로 확장을 수행함
- Kafka, RabbitMQ, AWS SQS, Azure Event Hub, Prometheus 쿼리 등 50개 이상의 이벤트 소스를 지원하여, 실시간 트래픽 변화나 백그라운드 작업에 유연하게 대응 가능함
- 내부적으로 HPA를 생성하고 관리하며, 이벤트 조건이 충족되면 HPA를 활성화하여 Pod 수를 자동 조절함
- 예를 들어, 특정 시간대에 메시지 큐에 쌓인 작업량이 많아지는 경우 이를 감지해 파드를 미리 확장하거나, 외부 요청 수가 급증할 때 빠르게 대응할 수 있음
- 정적 스케줄링(HPA + cronjob)이나 단순 리소스 사용률 기반 확장의 한계를 보완하며, 클라우드 네이티브 환경에 적합한 확장 메커니즘을 제공함
3. 어플리케이션 변수 관리
3.1. ConfigMap
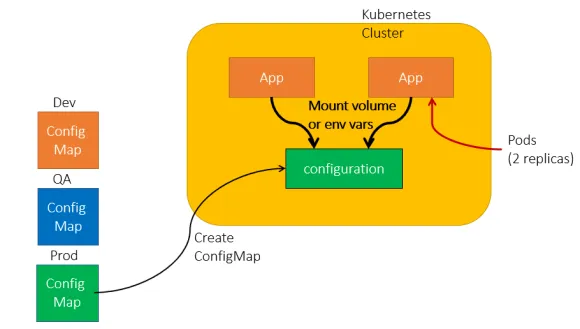
- Kubernetes 애플리케이션의 설정 정보를 Key-Value 형태로 저장하고 외부에서 관리할 수 있도록 지원하는 리소스
- 설정 데이터를 이미지에 직접 포함하지 않고 분리함으로써, 애플리케이션을 재빌드하지 않고도 설정을 변경할 수 있음
- 파드의 환경 변수 또는 볼륨 마운트를 통해 컨테이너 내부에서 ConfigMap 값을 참조할 수 있음
- 주요 사용 목적
- 애플리케이션 설정 관리
- 데이터베이스 URL, 외부 API 주소 등 구성 정보를 ConfigMap에 저장하고 파드에 주입하여 사용
- 환경별 설정 분리
- 개발, 스테이징, 운영 환경별로 다른 설정 값을 관리하여 동일한 컨테이너 이미지를 재사용 가능하게 함
# ConfigMap 샘플 구성
apiVersion: v1
kind: ConfigMap
metadata:
  name: my-config # ConfigMap 명칭
data:
  key1: value1    # Key : Value 형태 값 주입
  key2: value2
# ConfigMap 사용 예시
apiVersion: v1
kind: Pod
metadata:
name: my-app
spec:
containers:
- name: my-container
image: my-image
env:
- name: MY_CONFIG_KEY # 컨테이너에서 사용할 변수 Key 값
valueFrom:
configMapKeyRef:
name: my-config # 사용할 ConfigMap의 이름
key: key1 # ConfigMap 내의 키 -> 값: value1ConfigMap 기본 활용
- 기본 생성 및 확인
cat <<EOF | kubectl apply -f -
apiVersion: v1
kind: ConfigMap
metadata:
  name: mysql
data:
  DBNAME: mydatabase
---
apiVersion: v1
kind: Pod
metadata:
  name: nginx-configmap
spec:
  containers:
  - image: nginx
    name: nginx-configmap
    env:
    - name: DB
      valueFrom:
        configMapKeyRef:
          name: mysql
          key: DBNAME
EOF

# 오브젝트 확인
kubectl get cm,pod

# 상세 정보 조회
kubectl describe cm mysql
kubectl describe pod nginx-configmap

# pod 내부 변수 확인
kubectl exec -it nginx-configmap -- /bin/bash -c env
...
DB=mydatabase
...

# 리소스 삭제
kubectl delete pod --all
kubectl delete cm nginx-configmap
ConfigMap 으로 설정 파일 관리
- yaml 생성
# 테스트 파일 생성
cat << EOF >> config-deploy.yaml
apiVersion: apps/v1
kind: Deployment
metadata:
  name: nginx-configmap-deploy
spec:
  replicas: 2
  selector:
    matchLabels:
      app: nginx-configmap
  template:
    metadata:
      labels:
        app: nginx-configmap
    spec:
      containers:
      - name: nginx
        image: nginx
        ports:
        - containerPort: 80
        volumeMounts:
        - name: config-volume
          mountPath: /etc/nginx/nginx.conf
          subPath: nginx.conf
      volumes:
      - name: config-volume
        configMap:
          name: nginx-config
---
apiVersion: v1
kind: Service
metadata:
  name: nginx-service
spec:
  selector:
    app: nginx-configmap
  ports:
    - protocol: TCP
      port: 80
      targetPort: 80
      nodePort: 31001
  type: NodePort
EOF

cat << EOF >> configmap.yaml
apiVersion: v1
kind: ConfigMap
metadata:
  name: nginx-config
data:
  nginx.conf: |
    events {}
    http {
        server {
            listen 80;
            location / {
                return 200 'Hello from nginx configmap!';
            }
        }
    }
EOF- 리소스 배포
kubectl apply -f configmap.yaml -f config-deploy.yaml

#
kubectl get cm,deploy,pod
kubectl describe deploy
...
    Mounts:
      /etc/nginx/nginx.conf from config-volume (rw,path="nginx.conf")
  Volumes:
   config-volume:
    Type:          ConfigMap (a volume populated by a ConfigMap)
    Name:          nginx-config
    Optional:      false
...

# Nginx 접속
open http://localhost:31001

# Nginx ConfigMap 변경
vim configmap.yaml
...
return 200 'Modify from nginx configmap!';
...

#
kubectl apply -f configmap.yaml

# pod 재시작
kubectl rollout restart deploy nginx-configmap-deploy

# 리소스 삭제
kubectl delete -f configmap.yaml -f config-deploy.yaml
결과 확인
- cm 수정 후 deploy 재시작하여 response 변경 확인
- nginx 쉘 내부에서 로컬호출
kubectl exec -it $(kubectl get pod -l app=nginx-configmap -o jsonpath='{.items[0].metadata.name}') -- curl localhost:80

- 참고) Reloader

- ConfigMap 변경 시 Pod 수동 재배포가 필요 → 비효율적
- ConfigMap, Secret 의 변동 사항을 주기적으로 확인해서 자동으로 Rollout 을 해주는 오픈소스 도구
3.2. Secret
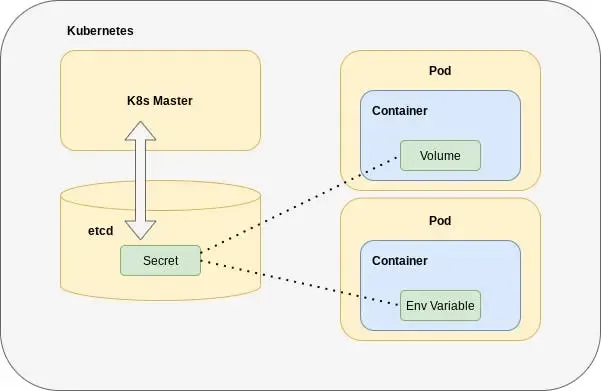
- Kubernetes의 Secret은 비밀번호, 토큰, SSH 키 등 민감한 정보를 안전하게 관리하기 위한 리소스
- ConfigMap과 유사한 방식으로 데이터를 저장하지만, 모든 값은 Base64 인코딩된 상태로 저장
- Base64는 단순 인코딩일 뿐 암호화가 아니며, 전송 중 노출을 막기 위한 형식일 뿐 보안성을 보장하지 않음
- Secret은 파드의 환경 변수로 주입하거나 파일로 마운트하여 컨테이너 내부에서 사용할 수 있음
- 주요 사용 사례
- 데이터베이스 비밀번호, API 키, TLS 인증서 등 외부에 노출되면 안 되는 정보 저장
- ConfigMap과 동일한 방식으로 참조 가능하지만, 보다 민감한 데이터 처리에 적합
# Secret 샘플
apiVersion: v1
kind: Secret
metadata:
  name: my-secret
type: Opaque
data:
  username: bXl1c2Vy  # base64로 인코딩된 값
  password: bXlwYXNzd29yZA==  # base64로 인코딩된 값
# Secret 사용 예시
apiVersion: v1
kind: Pod
metadata:
name: my-app
spec:
containers:
- name: my-container
image: my-image
env:
- name: DB_USER # Container 에서 사용할 변수명
valueFrom:
secretKeyRef:
name: my-secret # 사용할 Secret의 이름
key: username # Secret 내의 키
- name: DB_PASSWORD
valueFrom:
secretKeyRef:
name: my-secret # 사용할 Secret의 이름
key: password # Secret 내의 키
...
# 마운트 방법
volumeMounts:
- name: secret-volume # Volume 명칭
mountPath: /etc/secrets # 컨테이너 내부 마운트 위치
volumes:
- name: secret-volume # Volume 명칭
secret:
secretName: my-secret # 사용할 Secret의 이름Secret 기본 활용
- secret 리소스 생성 및 조회
cat <<EOF | kubectl apply -f -
apiVersion: v1
kind: Secret
metadata:
name: secret-test
type: Opaque
data:
username: YWRtaW4= # 'admin'을 base64 인코딩한 값
password: cGFzc3dvcmQ= # 'password'를 base64 인코딩한 값
EOF
# Base64 인코딩 방법
echo -n 'admin' | base64
echo -n 'password' | base64
#
cat <<EOF | kubectl apply -f -
apiVersion: v1
kind: Pod
metadata:
name: secret-pod
spec:
containers:
- name: nginx
image: nginx
env:
- name: DB_USER
valueFrom:
secretKeyRef:
name: secret-test
key: username
- name: DB_PASS
valueFrom:
secretKeyRef:
name: secret-test
key: password
EOF
#
kubectl get pod,secret
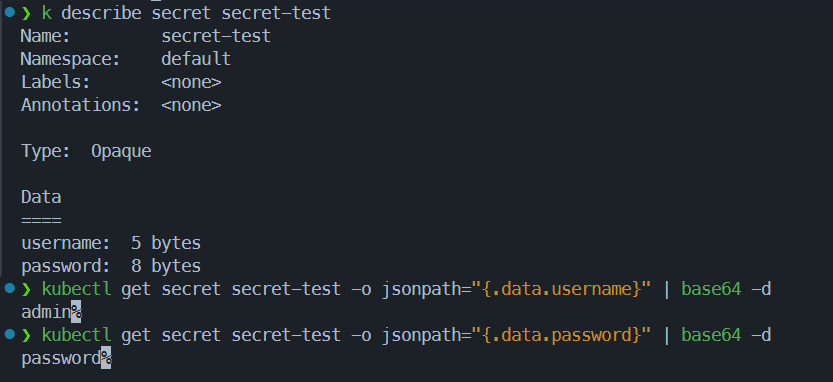
# 상세 정보 조회
kubectl describe secret secret-test
kubectl describe pod secret-pod
# pod 내부 변수 확인
kubectl exec -it secret-pod -- /bin/bash -c env
...
DB_USER=admin
DB_PASS=password
...
# 리소스 삭제
kubectl delete pod --all
kubectl delete secret secret-test결과 확인
- secret에 저장되어있는 데이터를 base64 decode 하여 확인
- pod 내부에 적용된 env 값 확인

4. Network

- Service – k8s docs
- 외부와 접하는 단일 엔드포인트
- 서비스 뒷단의 애플리케이션으로 외부 트래픽을 전송
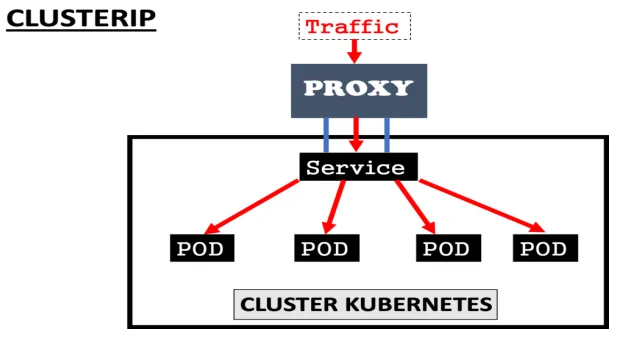
ClusterIP– 참고- 쿠버네티스 클러스터 범위의 가상 IP 부여
- 클러스터 내부에서만 ClusterIP 로 접근 가능
- 서비스 타입을 지정하지 않을 경우 기본값
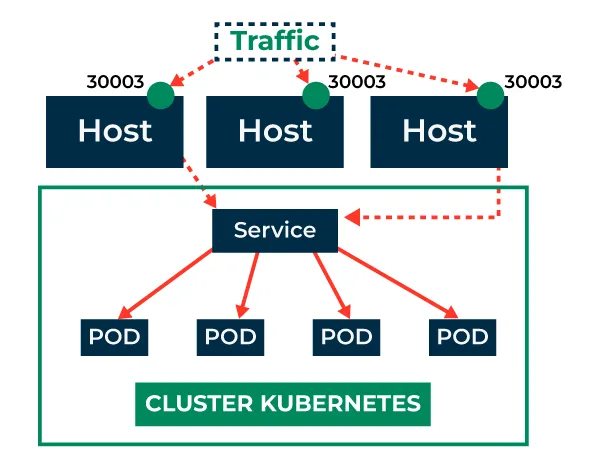
NodePort– 참고- 고정 포트로 각 노드(Host) 의 포트를 노출
- 클러스터 외부에서 노드(Host) 의 IP:Port 를 통해 접근 가능
LoadBalancer– 참고- 외부 로드 밸런서를 지원하는 클라우드 공급자 상에서 활용
- AWS, Azure, GCP 등의 LB 서비스와 쿠버네티스 서비스를 연결
4.1. ClusterIP
테스트 환경 배포
# 어플리케이션 배포
cat << EOF >> cluster-pod.yaml
apiVersion: v1
kind: Pod
metadata:
  name: cluster-pod-1
  labels:
    app: cluster-pod
spec:
  containers:
  - name: container
    image: traefik/whoami
---
apiVersion: v1
kind: Pod
metadata:
  name: cluster-pod-2
  labels:
    app: cluster-pod
spec:
  containers:
  - name: container
    image: traefik/whoami
EOF

# Test 파드
cat << EOF >> netshoot-pod.yaml
apiVersion: v1
kind: Pod
metadata:
  name: netshoot-pod
spec:
  containers:
  - name: netshoot-pod
    image: nicolaka/netshoot
    command: ["tail"]
    args: ["-f", "/dev/null"]
EOF

# ClusterIP 서비스 생성
cat <<EOF>> cluster-svc.yaml
apiVersion: v1
kind: Service
metadata:
  name: cluster-svc
spec:
  type: ClusterIP
  selector:
    app: cluster-pod
  ports:
    - name: cluster
      port: 8080
      targetPort: 80
EOF

# 배포
kubectl apply -f cluster-pod.yaml -f cluster-svc.yaml -f netshoot-pod.yaml
pod/ClusterIP 확인
- pod 생성 확인
# 파드 대역 확인
kubectl get nodes -o jsonpath='{.items[*].spec.podCIDR}'
...
10.244.0.0/24 10.244.1.0/24
...

# SVC 대역 확인
kubectl -n kube-system get pods -l component=kube-controller-manager -o yaml | grep service-cluster-ip-range
...
--service-cluster-ip-range=10.96.0.0/16
...

# 확인
kubectl get pod -o wide
...
NAME                                         READY   STATUS    RESTARTS   AGE     IP            NODE          NOMINATED NODE   READINESS GATES
cluster-pod-1                                1/1     Running   0          67s   10.244.1.26   kind-worker   <none>           <none>
cluster-pod-2                                1/1     Running   0          67s   10.244.1.27   kind-worker   <none>           <none>
netshoot-pod                                 1/1     Running   0          67s   10.244.1.28   kind-worker   <none>           <none>
...

# 서비스 확인
kubectl get svc cluster-svc
...
NAME          TYPE        CLUSTER-IP      EXTERNAL-IP   PORT(S)    AGE
cluster-svc   ClusterIP   10.96.193.184   <none>        8080/TCP   98s
...

# Endpoint 확인 (Pod IP:Port)
kubectl get endpoints cluster-svc
...
NAME                                ENDPOINTS                       AGE
cluster-svc                         10.244.1.26:80,10.244.1.27:80   113s
...- ClusterIP 확인
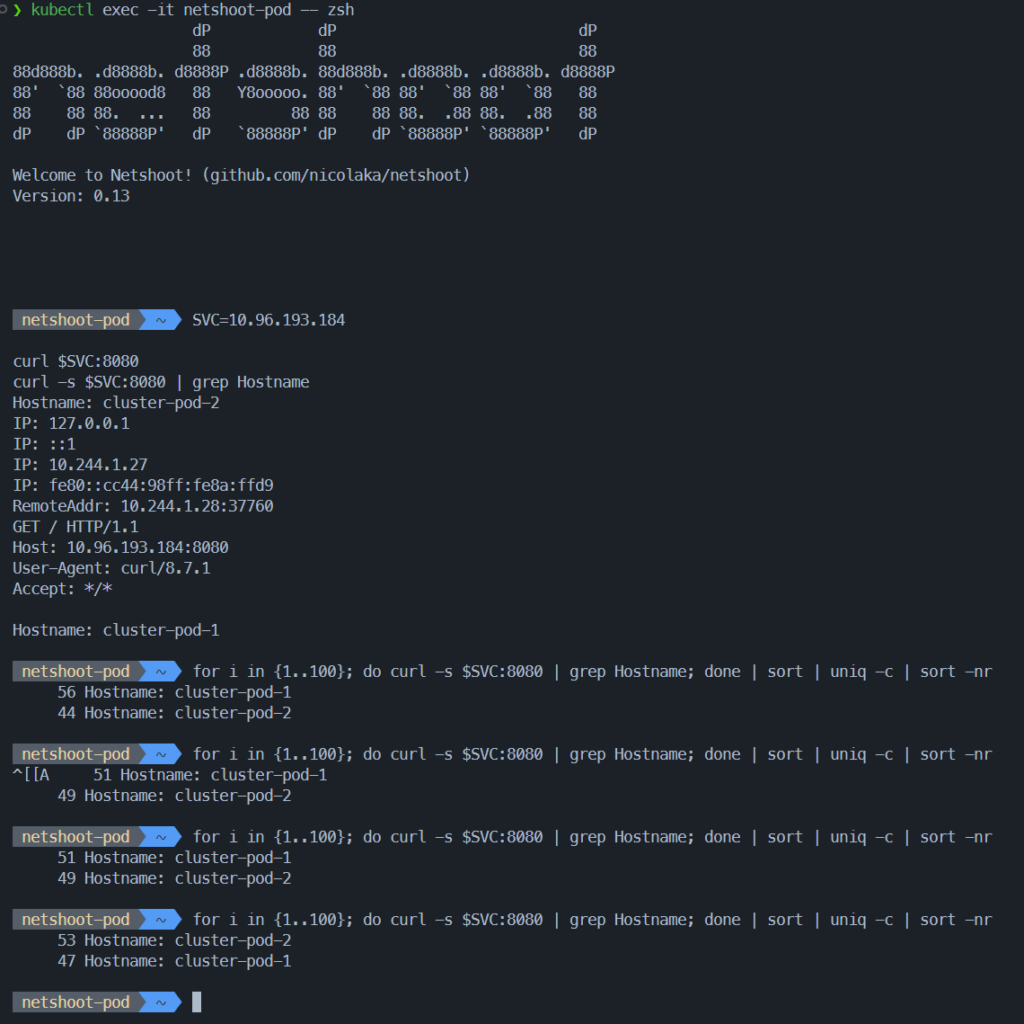
# 클라이언트(TestPod) Shell 실행
kubectl exec -it netshoot-pod -- zsh

# 서비스 ClusterIP 주입
SVC=10.96.193.184

curl $SVC:8080
curl -s $SVC:8080 | grep Hostname

# 100 번 반복 호출
for i in {1..100}; do curl -s $SVC:8080 | grep Hostname; done | sort | uniq -c | sort -nr
...
55 Hostname: cluster-pod-1
45 Hostname: cluster-pod-2
...
결과 확인
- svc rr 동작 확인
4.2. NodePort
테스트 환경 배포
- yaml 생성
# 어플리케이션 배포
cat << EOF > nodeport-pod.yaml
apiVersion: apps/v1
kind: Deployment
metadata:
  name: nodeport-deploy
spec:
  replicas: 2
  selector:
    matchLabels:
      app: nodeport-deploy
  template:
    metadata:
      labels:
        app: nodeport-deploy
    spec:
      containers:
      - name: container
        image: traefik/whoami
EOF

# ClusterIP 서비스 생성
cat <<EOF> nodeport-svc.yaml
apiVersion: v1
kind: Service
metadata:
  name: nodeport-svc
spec:
  type: NodePort
  selector:
    app: nodeport-deploy
  ports:
    - name: nodeport-svc
      port: 80          # 서비스 포트 (Cluster 내부에서 사용)
      targetPort: 80    # 실제 컨테이너 포트
      nodePort: 31001   # 외부에서 접근할 NodePort
EOF- 생성 및 동작 확인
# 생성
kubectl apply -f nodeport-pod.yaml -f nodeport-svc.yaml

# 확인
kubectl get pod,svc
...
NAME                   TYPE        CLUSTER-IP     EXTERNAL-IP   PORT(S)        AGE
service/nodeport-svc   NodePort    10.96.115.75   <none>        80:31001/TCP   10s
...

kubectl get endpoints nodeport-svc
NAME           ENDPOINTS                       AGE
nodeport-svc   10.244.1.29:80,10.244.1.30:80   28s
NodePort 동작 확인
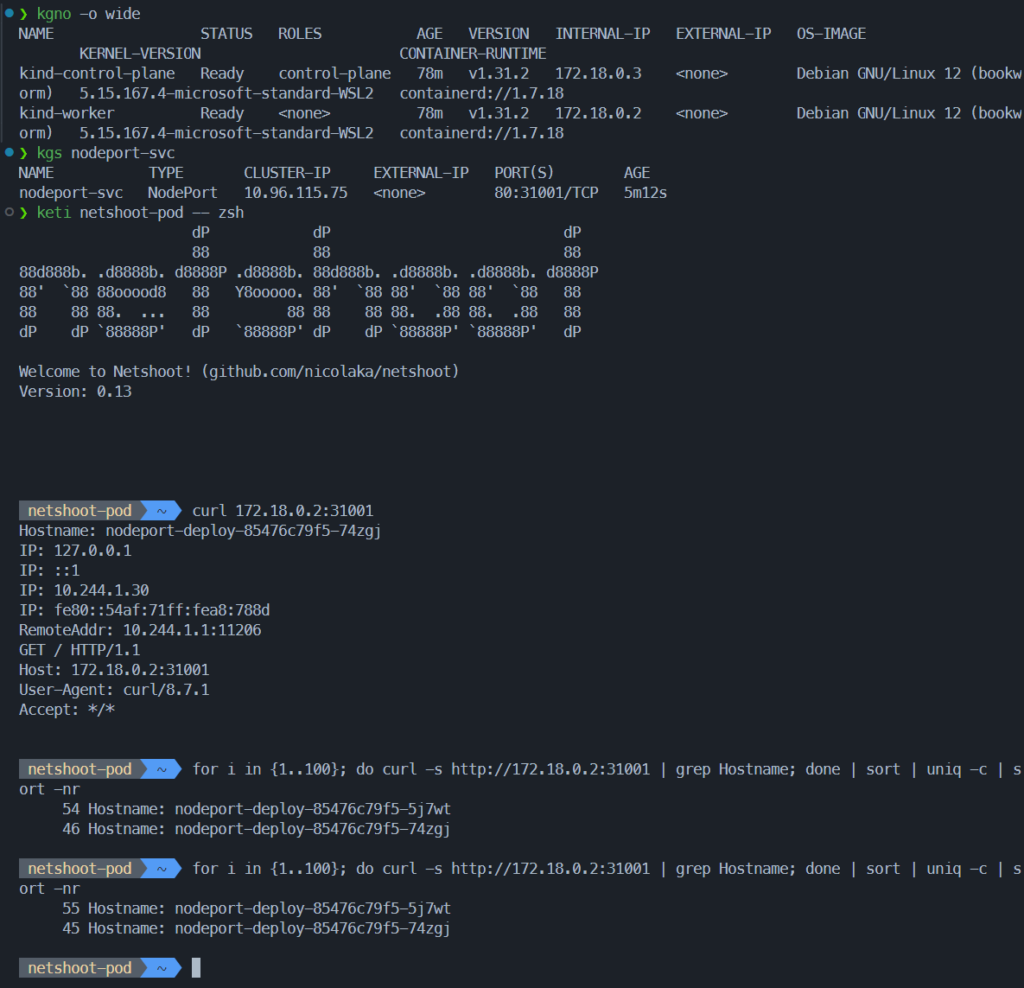
- WSL에서 nodeport 직접 찌르기가 안되어 netshoot에서 노드의 노드포트 찌르기
# 노드의 Port 로 curl 요청
curl http://localhost:31001
curl -s http://localhost:31001 | grep Hostname

# 100 번 반복 호출
for i in {1..100}; do curl -s http://localhost:31001 | grep Hostname; done | sort | uniq -c | sort -nr
...
58 Hostname: nodeport-deploy-59b68567d7-6h562
42 Hostname: nodeport-deploy-59b68567d7-k2cpb
...
결과 확인
4.3. Ingress

- 클러스터 외부에서 내부 서비스로 트래픽을 라우팅 하는 방법을 제공하는 리소스
- 클러스터 내부 서비스 (ClusterIP, NodePort, LoadBalancer) 를 외부로 노출 (HTTP / HTTPS) – Web Proxy 역할
- Ingress 를 사용하기 위해서는 Ingress Controller 가 필요
- 대표적인 Ingress Controller
- Nginx Ingress Controller
- Cloud Provider Ingress Controllers
- (ex. AWS ALB Ingress Controller, GCP Ingress Controller)
- 주요 기능
- 호스트 기반 라우팅
- 호스트 이름 (도메인)을 기반으로 트래픽 라우팅 가능
api.example.com/www.example.com을 각각 다른 Service 리소스와 연결
- 경로 기반 라우팅
- 요청 경로 기반으로 트래픽 라우팅 가능
/growth,/log경로를 각각 다른 Service 리소스와 연결
- TLS 설정
- TLS 인증서를 활용하여 HTTPS 구성 가능
- 로드 밸런싱
- 내부 서비스에 대한 로드 밸런싱
- 호스트 기반 라우팅
apiVersion: networking.k8s.io/v1
kind: Ingress
metadata:
  name: example-ingress
  namespace: default
spec:
  rules:
  - host: example.com       # Domain Host
    http:
      paths:
      - path: /service1     # URL Path (example.com/service1)
        pathType: Prefix
        backend:
          service:
            name: service1  # /service1 로 들어온 트래픽을 전송할 service 명
            port:
              number: 80
      - path: /service2     # URL Path (example.com/service2)
        pathType: Prefix
        backend:
          service:
            name: service2
            port:
              number: 80    # /service2 로 들어온 트래픽을 전송할 service 명
Nginx Ingress Controller 설치 및 구성
- Ingress Controller 중 가장 대중적이며 Ingress 동작 방식 테스트 가능
# 기존 리소스 삭제
kind delete cluster

# kind cluster 재배포
kind create cluster --config kind-2node.yaml

# Nginx Ingress Controller 설치
kubectl apply -f https://raw.githubusercontent.com/kubernetes/ingress-nginx/main/deploy/static/provider/cloud/deploy.yaml

# Service 타입 변경
kubectl patch svc ingress-nginx-controller -n ingress-nginx -p \
'{"spec":{"type":"NodePort","ports":[{"port":80,"targetPort":80,"nodePort":31000},{"port":443,"targetPort":443,"nodePort":31001}]}}'

# Nginx Ingress Controller 리소스 확인
kubectl get -n ingress-nginx svc,deploy,pod
Service 및 Ingress 생성
- 서비스 생성
# Growth 서비스
cat << EOF > svc-growth.yaml
apiVersion: v1
kind: Service
metadata:
  name: growth-service
spec:
  selector:
    app: growth
  ports:
    - protocol: TCP
      port: 80
      targetPort: 80
---
apiVersion: apps/v1
kind: Deployment
metadata:
  name: growth-deployment
spec:
  replicas: 1
  selector:
    matchLabels:
      app: growth
  template:
    metadata:
      labels:
        app: growth
    spec:
      containers:
        - name: nginx
          image: nginx
          ports:
            - containerPort: 80
          volumeMounts:
            - name: growth-html
              mountPath: /usr/share/nginx/html
      volumes:
        - name: growth-html
          configMap:
            name: growth-html
---
apiVersion: v1
kind: ConfigMap
metadata:
  name: growth-html
data:
  index.html: |
    <html>
    <body>
      <h1>hello growth</h1>
    </body>
    </html>
EOF

kubectl apply -f svc-growth.yaml

# Log 서비스
cat << EOF > svc-log.yaml
apiVersion: v1
kind: Service
metadata:
  name: log-service
spec:
  selector:
    app: log
  ports:
    - protocol: TCP
      port: 80
      targetPort: 80
---
apiVersion: apps/v1
kind: Deployment
metadata:
  name: log-deployment
spec:
  replicas: 1
  selector:
    matchLabels:
      app: log
  template:
    metadata:
      labels:
        app: log
    spec:
      containers:
        - name: nginx
          image: nginx
          ports:
            - containerPort: 80
          volumeMounts:
            - name: log-html
              mountPath: /usr/share/nginx/html
      volumes:
        - name: log-html
          configMap:
            name: log-html
---
apiVersion: v1
kind: ConfigMap
metadata:
  name: log-html
data:
  index.html: |
    <html>
    <body>
      <h1>hello log</h1>
    </body>
    </html>

EOF

kubectl apply -f svc-log.yaml

# 배포 확인
kubectl get pod,svc,cm

# ConfigMap 확인
kubectl describe cm growth-html
kubectl describe cm log-html
- Ingress 배포
cat << EOF > ingress-sample.yaml
apiVersion: networking.k8s.io/v1
kind: Ingress
metadata:
  name: growth-log-ingress
  annotations:
    nginx.ingress.kubernetes.io/rewrite-target: / # /growth, /log 요청을 서비스로 전달할 때 접두사 제거. ex) /growth -> growth-service '/'
spec:
  ingressClassName: nginx
  rules:
  - http:
      paths:
      - path: /growth
        pathType: Prefix
        backend:
          service:
            name: growth-service
            port:
              number: 80
      - path: /log
        pathType: Prefix
        backend:
          service:
            name: log-service
            port:
              number: 80
EOF

kubectl apply -f ingress-sample.yaml

kubectl get ing,svc

#
kubectl describe ingress growth-log-ingress
Ingress 동작 확인
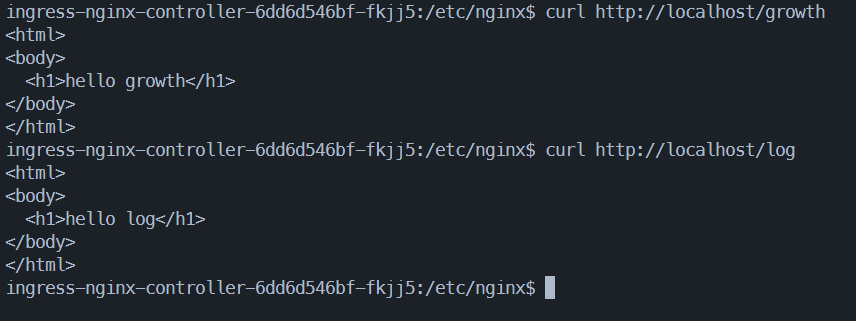
- 경로 기반 응답 확인
# growth 경로 호출
curl http://localhost:31000/growth
...
<html>
<body>
  <h1>hello growth</h1>
</body>
</html>
...

# Log 경로 호출
curl http://localhost:31000/log
...
<html>
<body>
  <h1>hello log</h1>
</body>
</html>
...
결과 확인
- nginx ingress pod에서 각 경로 호출시 해당 pod의 응답 확인
5. Storage
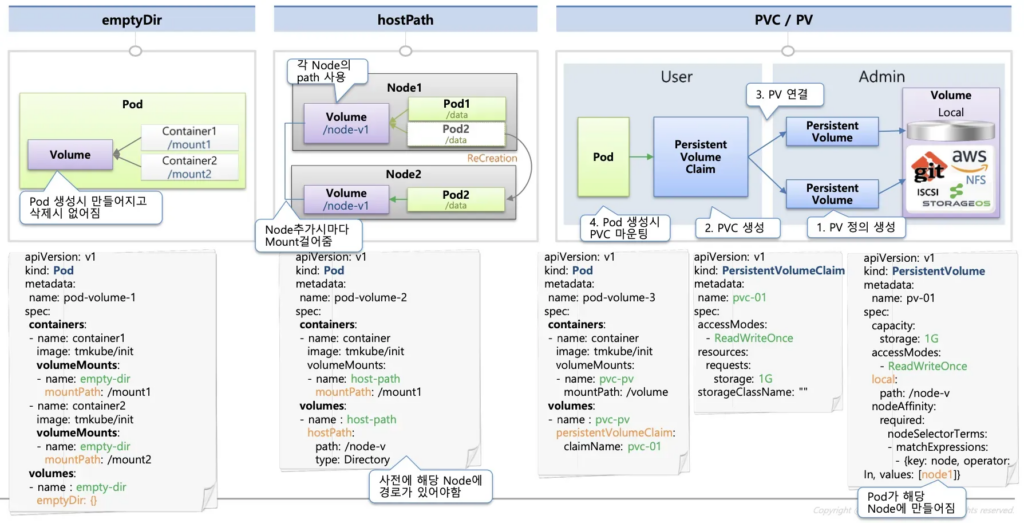
emptyDir- Pod 내부에 존재하며 동일한 Pod 의 컨테이너 간 공유될 수 있는 스토리지
- Pod 삭제 시 함께 삭제
- Container 가 사용하는 임시 저장소
hostPath- Pod 가 배포된 Worker Node 의 Directory Path 를 Pod 에 마운트
- Pod 가 삭제되어도 데이터는 Worker Node 에 존재
- 하지만 해당 Pod 가 배포된 Node 에만 데이터를 저장하므로, 다른 노드에 배포된 파드와는 공유할 수 없음
Persistent volume (PV)- 쿠버네티스 클러스터 전체의 공유 볼륨
- 다양한 크기의 볼륨을 가진 PV 를 미리 만들어 두고 Pod 가 필요할 때 연결하여 사용
- 이 때, Pod 와 PV 를 연결하는 작업이 PVC(PersistentVolumeClaim)
