
TL DR;
- 장기자격증명인 SSH Key 대신 GitHub OIDC로 임시 자격증명을 발급받아 보안 강화
- AWS IAM에 OIDC Provider와 Role을 설정하고, GitHub Actions에서 AWS STS로 임시 토큰 발급받아 사용
- 배포·빌드 시 별도 secret 세팅 절차 없이 바로 사용가능해서 사용성 향상
1. Intro
- 이전 글에서 GitHub Action 동작시 SSH키를 통해 EC2에 접근하여 배포하도록 설정하였음
- 그러나 SSH 및 Access Key와 같은 장기 자격 증명은 보안적으로 위험하다.
- 영구키의 경우 영구적으로 유효하며 만료되지 않는다. 따라서 노출 되었을 경우, 장기적으로 권한이 악용될 가능성이 높다
- 해당 키의 사용 확인 및 관리가 어렵다. 노출이 방지 되어야하기에 보통 최초 생성시 1회에 재확인이 불가능하다. 이후 그 자격증명이 어디에서 쓰이고 있는지, 실제 사용중인지 확인하기가 매우 어렵다.
- 대안으로 Hashicorp Vault 및 AWS STS와 같은 임시 자격 증명의 사용이 권장된다.
- 모범 사례는 액세스 키와 같은 장기 보안 인증을 생성하는 대신 임시 보안 인증(예: IAM 역할)을 사용하는 것입니다. 액세스 키를 생성하기 전에 장기 액세스 키의 대안을 검토합니다.
- 가능하면 IAM 역할을 사용하여 임시 보안 인증 정보 생성 – 가능하면 장기 액세스 키보다는 항상 메커니즘을 사용하여 임시 보안 인증 정보를 발급하세요. 임시 보안 인증 정보는 사용자와 함께 저장되지 않지만 동적으로 생성되어 요청 시 사용자에게 제공되므로 더 안전합니다. 임시 보안 인증 정보는 수명이 제한되어 있으므로 관리하거나 업데이트할 필요가 없습니다. 임시 액세스 키를 제공하는 메커니즘으로는 IAM 역할, IAM Identity Center 사용자의 인증 등이 있습니다.
- GHA 동작과정에서 github OIDC provider에게 JWT 토큰을 생성하고, 이를 통해 AWS provider에게 STS 토큰을 발급받아 해당하는 AWS IAM Role을 수행할 수 있음
- 또한 조직으로 묶인 레포가 아니라 각각 퍼블릭 레포로 작업중이기에 해당레포에 secret설정하지 않아도 단순 파이프라인(.github/workflow/*.yaml)을 가져가는것만으로도 실행할 수 있음
2. 설정과정
2.1. Adding the identity provider to AWS
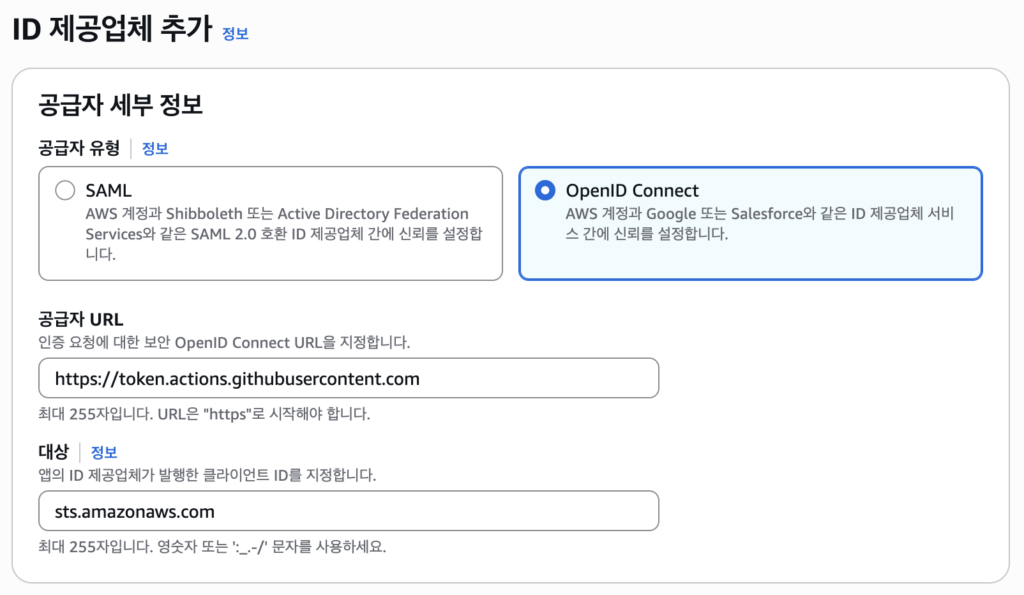
- AWS IAM의 Identity Providers에 사용할 identity provider(ldp)를 등록하여야 한다.
- OpenID Connect 유형의 provider, Provider URL에
https://token.actions.githubusercontent.com, Audience에sts.amazonaws.com를 입력한다- Provider URL > 등록할 github provider의 URL
- Audience > 토큰 생성시 사용 용도 검증용 (sts 토큰 발급 외 사용 불가)
2.2. Configuring the role and trust policy
- AWS Role을 생성하고 해당 role이 github OIDC 토큰을 통해 sts 토큰을 발급 받을 수 있도록 설정한다
- 사전에 AWS Role이 생성되어있어야하며, 권한(Permissions)이 아닌 신뢰관계(Trust relations)에 허용할 OIDC 공급자(github)와 요청자(github org/user/repo 등)을 설정 할 수 있다
- Statement.Principal.Federated >
"Federated": "arn:aws:iam::<AWS계정ID>:oidc-provider/token.actions.githubusercontent.com - Statement.Condition.StringEquals > OIDC 등록시 사용한 대상
sts.amazonaws.com - Statement.Condition.StringLike.”token.actions.githubusercontent.com:sub” > 발급을 허용할 대상 지정,
repo:ORG-NAME/REPO-NAME:environment:ENVIRONMENT-NAME형식- 특정레포의 모든 env환경 대상 > repo:nasir17git/korean-tour-data-2025-groot-data:* > nasir17git 이름의 git user/org의 korean-tour-data-2025-groot-data레포의 모든 env에 대해 사용
- 특정 계정에 대해 사용 > repo:nasir17git/* 식으로 입력하면 workflow가 해당 계정/조직에서 작동하면 토큰을 받아올 수 있도록 설정도 가능하다
- Statement.Principal.Federated >
{
	"Version": "2012-10-17",
	"Statement": [
		{
			"Effect": "Allow",
			"Principal": {
				"Federated": "arn:aws:iam::827604627136:oidc-provider/token.actions.githubusercontent.com"
			},
			"Action": "sts:AssumeRoleWithWebIdentity",
			"Condition": {
				"StringEquals": {
					"token.actions.githubusercontent.com:aud": "sts.amazonaws.com"
				},
				"StringLike": {
					"token.actions.githubusercontent.com:sub": [
						"repo:blcklamb/korean-tour-data-2025-groot-fe:*",
						"repo:minenam/korean-tour-data-2025-groot-be:*",
						"repo:nasir17git/korean-tour-data-2025-groot-data:*",
						"repo:nasir17git/korean-tour-data-2025-groot-fe:*"
					]
				}
			}
		}
	]
}
2.3. Updating your GitHub Actions workflow
- github workflow 작동시 github provider에 OIDC 토큰 요청을 허용하도록 설정해야한다 (default none)
- 이후
aws-actions/configure-aws-credentials와 같은 marketplace action을 사용하여, role-to-assume에 할당받을 AWS Role 역할을 지정하면 workflow 작동시 Github Provider OIDC 토큰(JWT) > AWS STS 토큰 생성 및 할당 > AWS IAM Role의 Token 의 과정을 거져 sts토큰을 통해 iam 역할이 설정된것처럼 작동할 수 있다
permissions:
  id-token: write   # This is required for requesting the JWT
  contents: read    # This is required for actions/checkout
2.4. 실제 파이프라인에 적용
- 기존에는 build후 ssh로 EC2에 접근해서 파일을 전송하였음 (scp)
- 해당방식은 ssh를 allow all 해두었기때문에 key 접근만 활성화하였어도 찝찝함
- github-hosted runner의 모든 IP의 대역을 등록할 수 없다
- github secret에 키 등록이 필요하며, 추후 github secret에 등록된 SSH 키이름만 보고 어떤키인지 확인할 수 있을까..
- 해당방식은 ssh를 allow all 해두었기때문에 key 접근만 활성화하였어도 찝찝함
- sts토큰을 발급받아 작동중인 runner에 적절한 AWS IAM Role 부여
- EC2 조회, S3 조회 및 업로드, SSM Commend 전송
- 빌드 후 빌드파일을 S3 버킷으로 전송 후, SSM을 통해 EC2로 배포 명령어 전송 및 실행
- Trust Relationship 이 설정된 IAM Role에 연결된 권한
- 개별 s3 bucket, ec2에 이름 또는 태그도 지정할까 하다가.. 사프인데 굳이 그정도까지야..
{
    "Version": "2012-10-17",
    "Statement": [
        {
            "Sid": "AllowS3Access",
            "Effect": "Allow",
            "Action": [
                "s3:GetObject",
                "s3:PutObject",
                "s3:ListBucket"
            ],
            "Resource": "*"
        },
        {
            "Sid": "AllowSSMSendCommand",
            "Effect": "Allow",
            "Action": [
                "ssm:SendCommand",
                "ssm:ListCommandInvocations",
                "ssm:ListCommands"
            ],
            "Resource": "*"
        },
        {
            "Sid": "AllowDescribeInstances",
            "Effect": "Allow",
            "Action": [
                "ec2:DescribeInstances"
            ],
            "Resource": "*"
        }
    ]
}- SSM으로 EC2 접근해 ec2-user 권한으로 tar.gz 다운로드 후 deploy.sh 실행
    # SSM으로 EC2 접근해 ec2-user 권한으로 tar.gz 다운로드 후 deploy.sh 실행
    - name: Trigger deploy.sh on EC2 via SSM
      run: |
        aws ssm send-command \
          --targets "Key=InstanceIds,Values=${{env.EC2_INSTANCE_ID}}" \
          --document-name "AWS-RunShellScript" \
          --comment "Deploy new frontend version" \
          --parameters 'commands=[
            "sudo -i -u ec2-user bash -c \
              \"aws s3 cp s3://groot-fe-preview/frontend/deploy.tar.gz /home/ec2-user/ && \
              cd /home/ec2-user && \
            ./deploy.sh\""
          ]'
전체 deploy.yaml
# https://raw.githubusercontent.com/blcklamb/korean-tour-data-2025-groot-fe/refs/heads/main/.github/workflows/deploy.yaml
name: deploy frontend

# 실행 이름: PR이벤트면 PR번호/제목 + SHA, 수동이면 브랜치+입력SHA
run-name: |
  ${{ github.event_name == 'pull_request' &&
      format('Deploy PR #{0} "{1}" / {2}',
        github.event.pull_request.number,
        github.event.pull_request.title,
        github.event.pull_request.head.sha
      )
      || format('Deploy BR {0} / {1}',
        github.ref_name,
        github.event.inputs.commit || 'latest HEAD'
      )
  }}

on:
  workflow_dispatch:
    inputs:
      commit:
        description: "8자리 short SHA (비워두면 브랜치의 최신 커밋)"
        required: false
  pull_request:
    types: [opened, synchronize, reopened]

permissions:
  contents: read
  pull-requests: write
  id-token: write

env:
  EC2_INSTANCE_ID: i-0ed0405fc7ced8fe4

jobs:
  build-and-deploy:
    runs-on: ubuntu-latest

    steps:
    # ✅ 공통 checkout: 이벤트별로 SHA 결정
    - name: Checkout code
      uses: actions/checkout@v4
      with:
        fetch-depth: 0
        ref: ${{ github.event_name == 'pull_request' && github.event.pull_request.head.sha || github.ref }}

    # ✅ SHA 계산 (PR이면 head.sha, 수동이면 입력값 or HEAD)
    - name: Resolve commit SHA
      id: resolve_sha
      run: |
        if [ "${{ github.event_name }}" = "pull_request" ]; then
          FULL_SHA="${{ github.event.pull_request.head.sha }}"
        else
          if [ -n "${{ github.event.inputs.commit }}" ]; then
            FULL_SHA=$(git rev-parse ${{ github.event.inputs.commit }})
          else
            FULL_SHA=$(git rev-parse HEAD)
          fi
        fi
        SHORT_SHA=$(echo $FULL_SHA | cut -c1-8)
        echo "Using commit: $FULL_SHA ($SHORT_SHA)"
        echo "full_sha=$FULL_SHA" >> $GITHUB_OUTPUT
        echo "short_sha=$SHORT_SHA" >> $GITHUB_OUTPUT

    - name: Setup Node.js
      uses: actions/setup-node@v4
      with:
        node-version: '22'
        cache: 'yarn'

    - name: Install dependencies
      run: yarn install --frozen-lockfile

    - name: Build application
      run: yarn build

    # ✅ 배포용 tar.gz 생성
    - name: Create deployment archive
      run: |
        tar -czf deploy.tar.gz \
          .next \
          public \
          package.json \
          yarn.lock \
          next.config.ts

    # AWS OIDC 기반 임시토큰 발급
    - name: Configure AWS credentials (OIDC)
      uses: aws-actions/configure-aws-credentials@v4
      with:
        role-to-assume: arn:aws:iam::827604627136:role/groot-git
        aws-region: ap-northeast-2

    - name: Upload deploy.tar.gz to S3
      run: aws s3 cp deploy.tar.gz s3://groot-fe-preview/frontend/deploy.tar.gz

    # SSM으로 EC2 접근해 ec2-user 권한으로 tar.gz 다운로드 후 deploy.sh 실행
    - name: Trigger deploy.sh on EC2 via SSM
      run: |
        aws ssm send-command \
          --targets "Key=InstanceIds,Values=${{env.EC2_INSTANCE_ID}}" \
          --document-name "AWS-RunShellScript" \
          --comment "Deploy new frontend version" \
          --parameters 'commands=[
            "sudo -i -u ec2-user bash -c \
              \"aws s3 cp s3://groot-fe-preview/frontend/deploy.tar.gz /home/ec2-user/ && \
              cd /home/ec2-user && \
            ./deploy.sh\""
          ]'

    # ✅ 배포된 URL 정상 응답 확인 (5분 동안 10초 간격 재시도)
    - name: Verify deployed URL
      run: |
        URL="https://preview.logonme.click"

        echo "🔍 배포 검증 시작: ${URL}"
        ATTEMPTS=30   # 30회 * 10초 = 5분
        COUNT=0

        while [ $COUNT -lt $ATTEMPTS ]; do
          STATUS_CODE=$(curl -s -o /dev/null -w "%{http_code}" "${URL}" || echo "000")
          echo "Attempt $((COUNT+1)) → HTTP $STATUS_CODE"

          if [ "$STATUS_CODE" = "200" ]; then
            echo "✅ 검증 성공! HTTP 200"
            exit 0
          fi

          COUNT=$((COUNT+1))
          echo "⏳ 10초 후 재시도..."
          sleep 10
        done

        echo "❌ 검증 실패! 5분 동안 HTTP 200 응답을 받지 못했습니다."
        exit 1

    # ✅ Summary 출력 (PR이벤트와 수동 둘 다 지원)
    - name: Write deployment summary
      run: |
        SHORT_SHA="${{ steps.resolve_sha.outputs.short_sha }}"
        URL="https://preview.logonme.click"

        echo "## 🚀 프론트엔드 배포 완료" >> $GITHUB_STEP_SUMMARY
        echo "" >> $GITHUB_STEP_SUMMARY

        if [ "${{ github.event_name }}" = "pull_request" ]; then
          echo "| 항목 | 값 |" >> $GITHUB_STEP_SUMMARY
          echo "|------|-----|" >> $GITHUB_STEP_SUMMARY
          echo "| PR 번호 | #${{ github.event.pull_request.number }} |" >> $GITHUB_STEP_SUMMARY
          echo "| 제목 | ${{ github.event.pull_request.title }} |" >> $GITHUB_STEP_SUMMARY
          echo "| 브랜치 | ${{ github.head_ref }} |" >> $GITHUB_STEP_SUMMARY
        else
          echo "| 항목 | 값 |" >> $GITHUB_STEP_SUMMARY
          echo "|------|-----|" >> $GITHUB_STEP_SUMMARY
          echo "| 브랜치 | ${{ github.ref_name }} |" >> $GITHUB_STEP_SUMMARY
        fi

        echo "| 커밋 SHA | \`${SHORT_SHA}\` |" >> $GITHUB_STEP_SUMMARY
        echo "| 접속 URL | [${URL}](${URL}) |" >> $GITHUB_STEP_SUMMARY

    # ✅ PR 이벤트면 코멘트 작성
    - name: Comment on PR with deployed commit
      if: github.event_name == 'pull_request'
      uses: actions/github-script@v7
      with:
        script: |
          const shortSha = "${{ steps.resolve_sha.outputs.short_sha }}";
          const url = `https://preview.logonme.click`;
          const pr_number = Number("${{ github.event.pull_request.number }}");

          github.rest.issues.createComment({
            issue_number: pr_number,
            owner: context.repo.owner,
            repo: context.repo.repo,
            body: `🚀 PR **#${pr_number} (${context.payload.pull_request.head.ref})**\n커밋 \`${shortSha}\` 이(가) **preview 환경**에 배포되었습니다!\n👉 [${url}](${url})`
          });
3.Outro
- DevOps로 근무하며 보안적인 이야기들을 무시할 수 없으며, 장기자격증명은 배제해야한다는 이야기는 자주듣는 이야기였다.
- 그럼에도 편하니까.. 레퍼런스많아서 구축 간단하니까.. 임시자격증명으로 바꾸려면 더 설정할거 많고 귀찮으니까..라며 눈돌리고 있었음
- 마음의 짐을 덜었다
- 사용자 입장에서도 별도로 설정할것 없이 해당 yaml파일만 레포에 추가해 작동하면 잘 돌기 때문에 더욱 간편해짐
- 이거 안전한거에요?(네 특정레포에서만 사용가능/특정 서비스에만 접근가능)에 대한 부분은 보이지않게 관리자가 AWS IAM에서 관리 가능